Spring Boot Application in OpenShift / OKD
Contents
tl;dr: Now that we have packaged an existing Spring Boot application into a Docker Image, we can deploy it to a Kubernet cluster as well.
In this example the additional features of OpenShift/OKD are used to enable a continuous deployment of the application.
Kubernetes has proven to be one of the best ways to orchestrate dockerized applications.
So the next logical step after packaging a Spring Boot application in a Docker Image is to deploy it in a cluster and enjoy the benefits of Kubernetes.
The following example is based on the RedHat Kubernetes distribution OpenShift1, which is also available as OpenSource version OKD2. To be able to follow the example without an existing OpenShift/OKD installation, you can also use MiniShift3, which is based on a minimal OKD installation in a local virtual machine.
Basics
First you should setup and configure the oc Client tool4 which allows us to create, modify and delete resources in our cluster.
The most important commands for now are:
# Login
oc login http://URL-OF-CLUSTER
# Create a new Resource from a file
oc create -f CONFIG-FILE.yml
# Update the Resource from a file
oc apply -f CONFIG-FILE.yml
# Delete a Resource defined in a file
oc delete -f CONFIG-FILE.yml
DeploymentConfig
Kubernetes runs images in Pods, which in turn are part of a Deployments. In contrast to other Kubernetes distributions, OpenShift uses DeploymentConfig5 which provides some additional features, more about this later.
The following yml file describes a DeploymentConfig which starts two instances (pods) of the spring-petclinic image and forwards port 8080.
apiVersion: "apps.openshift.io/v1"
kind: "DeploymentConfig"
metadata:
  labels:
    app: "spring-petclinic"
  name: "spring-petclinic"
spec:
  replicas: 2
  selector:
    app: "spring-petclinic"
    deploymentconfig: "spring-petclinic"
  strategy:
    type: "Rolling"
  template:
    metadata:
      labels:
        app: "spring-petclinic"
        deploymentconfig: "spring-petclinic"
    spec:
      containers:
        - name: "spring-petclinic"
          image: "foobar/spring-petclinic:latest"
          imagePullPolicy: "Always"
          ports:
            - containerPort: 8080
              protocol: "TCP"
  triggers:
    - type: "ConfigChange"
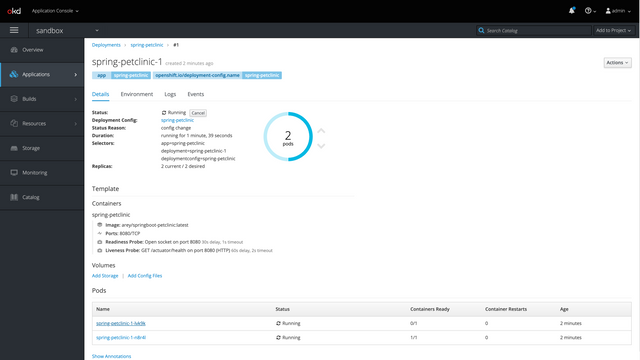
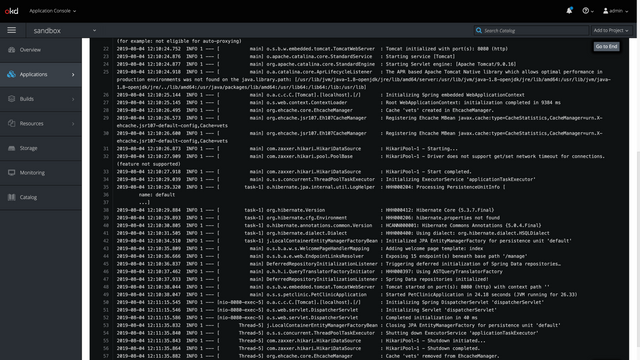
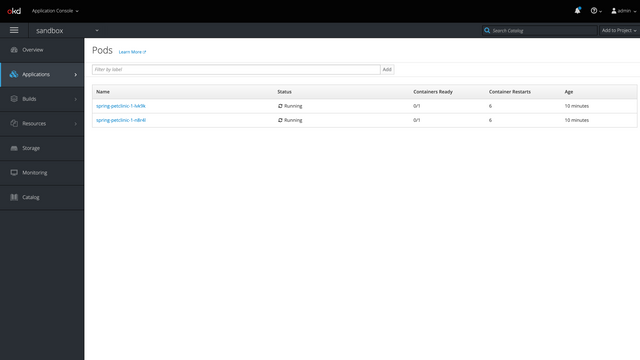
After creating the DeploymentConfig in OpenShift, Kubernetes starts the two defined pods and we can also see their logs in the WebUI.
oc create -f petclinic-deployment.yml

deploymentconfig.apps.openshift.io/spring-petclinic created
Liveness/Readiness Probes
Kubernetes can use Liveness and Readiness Probes6 to check whether a Pod has crashed or is unable to accept requests. The definition takes place in the containers block of DeploymentConfig. For both probes there are the following possibilities:
- HTTP Check
- Execution of a command in the Container
- TCP Socket Check
For Spring Boot applications, the Health endpoint7 can be used as a LivenessProbe. This actuator endpoint must be activated in the application and can then be included in the config. A TCP socket check can then be used to see if the Pod is already started and can accept further requests.
spec:
  containers:
    - name: spring-petclinic
      ...
      livenessProbe:
        initialDelaySeconds: 60
        timeoutSeconds: 2
        httpGet:
          path: /actuator/health
          port: 8080
          scheme: HTTP
      readinessProbe:
        initialDelaySeconds: 30
        timeoutSeconds: 1
        tcpSocket:
          port: 8080
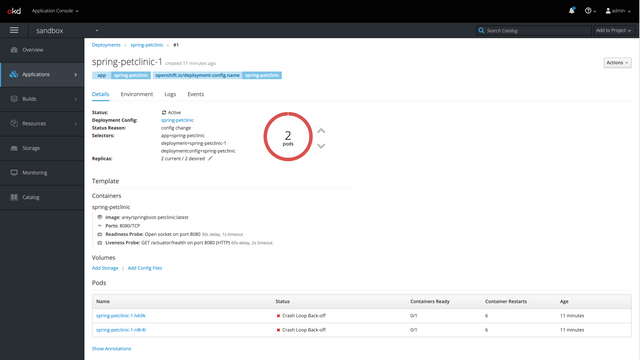
DeploymentConfig without activating the /actuator/health endpoint. The pod should now be restarted after a short time automatically.This is visible in the WebUI in the Deployment list.
oc apply -f petclinic-deployment.yml
Service and Routes
Currently our Pods are only reachable by other Pods which know the hostnames but not from an external address.
First we will now combine all Pods into a Service8 which provides a load-balancing over all live Pods. Afterwards this Service can be exposed as a Route9 which will receive a hostname that is reachable from our network.
You can decide, if you want to define all those Resources in separate files or use a single yml file and divide them using ---. I usually tend to create a central file with all Resources related to a Container.
kind: "Service"
apiVersion: "v1"
metadata:
  name: "spring-petclinic-service"
spec:
  ports:
    - port: 8080
      protocol: TCP
  selector:
    app: "spring-petclinic"

---
kind: Route
apiVersion: route.openshift.io/v1
metadata:
  name: "spring-petclinic-route"
spec:
  to:
    kind: Service
    name: spring-petclinic-service
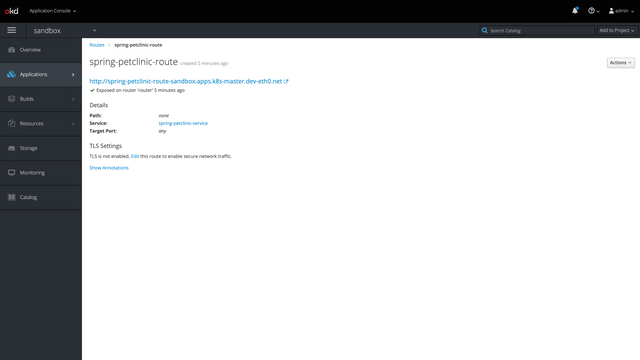
Now again apply the updated config and check the WebUI for the new Route.
If your DNS is configured correctly, you should now be able to reach the petclinic using the given hostname. Kubernetes will take care of the internal routing and also load-balance over the available Pods.
ImageStream
You might have noticed the declaration of triggers inside the DeploymentConfig. Those take care to deploy new Pods if any trigger is executed. Currently only configuration changes will cause a new Deployment but there is another quite important trigger available: ImageChange10 .
This trigger can be used to make sure, that the Pods always run the latest version of the used image and is therefor quite cool for continuous deployments.
ImageChange monitors an ImageStream which is basically a reference to a Docker Image. By default OpenShift performs a check every 15 minutes, but this can also be configured cluster-wide11.
kind: ImageStream
apiVersion: image.openshift.io/v1
metadata:
  name: "spring-petclinic-imagestream"
spec:
  tags:
    - from:
        kind: DockerImage
        name: "foobar/spring-petclinic:latest"
      name: "latest"
      importPolicy:
        scheduled: true
spec:
  containers:
    - name: spring-petclinic
      ...
      image: docker-registry.default.svc:5000/sandbox/spring-petclinic-imagestream
  triggers:
    - type: ConfigChange
    - type: "ImageChange"
      imageChangeParams:
        automatic: true
        from:
          kind: "ImageStreamTag"
          name: "spring-petclinic-imagestream:latest"
        containerNames:
          - "spring-petclinic"
Footnotes
Gallery

Comments